Quantcast
Channel: The EXPTA {blog}
Viewing all 301 articles
Browse latest View live

An Open Letter to Microsoft Learning

$
0
0
Yesterday I was notified of a new video touting how Microsoft Learning is revamping its Exchange 2013 exams and certification requirements for Exchange 2013 SP1. As someone who has worked with Microsoft to help rewrite exams for Exchange 2010 SP1, I was interested to see what @MSLearning had to say. I was met with great disappointment when I was greeted with the following video (since removed, but still found on YouTube).


In response I tweeted on Twitter, "One more reason that customers need the MCM program. I weep for our future."

As a Microsoft Certified Master and someone who takes great pride in the 77 Microsoft certifications I hold, I take Microsoft certifications seriously. As a Microsoft Gold Partner ExtraTeam does, as well, and makes its mark in the professional services industry by hiring the the most highly certified consultants and engineers in the industry.

Judging by the feedback I received to my tweet, I know that other IT Pros share my sense of frustration and dismay about the direction of Microsoft Learning.

Veronica Wei Sopher of Microsoft Learning responded to my tweet, genuinely asking for my feedback - so here it is:

  • Take yourself seriously. "Sesame Street" style videos have no place in a professional certification program. As one person wrote, "The costumes? No names? This needs to feel more work related if the sound is muted." How do you think this looks to hiring managers? I can't imagine anything like this coming from the Cisco or CCISP certification programs.
  • Be respectful and show ownership. Many IT Pros, such as myself, have invested significant amounts of time preparing for, taking exams, and maintaining their Microsoft certifications. Many do it on their own time and with their own money. It's embarrassing and insulting to all IT Pros to be associated with a program that makes fun of certifications and the process.
  • Have integrity. Like other MCM candidates, I spent 21 days in Redmond learning 24x7 about Exchange in the MCM program and I'd do it again in a heartbeat. It was one of the best learning experiences of my life. That's why it was so disappointing when Microsoft Learning canceled the MCM program without any notice, even to the Exchange product group. When Tim Sneath canceled the program in September 2013, he told us that Microsoft Learning was looking into ways to revamp the program. It's been nearly a year later and we have heard absolutely nothing. At this time, the highest level of certification that IT Pros can achieve is an MCSE, which is pretty much worthless due to cheating and brain dumps. There has to be a better top-tier certification for Microsoft products than what is available now.
Have a comment? Please leave one below.


Poll: Which new Hyper-V lab server build would you be more likely to buy?

$
0
0
I am preparing to create my 5th generation Super-Fast Hyper-V Lab Server build. As usual, I will create a parts list, photos, videos, and tips about the build on this blog, but I need your help.

I normally stick to a small Micro ATX form factor which currently supports a maximum of 32GB RAM. I currently run this build at home and I'm happy that it doesn't take much room and uses less power. 32GB RAM is enough to run 6-7 medium/large servers at once 24x7.

Some IT Pros have asked for a build that supports 64GB RAM so they can run more or larger VMs. A 64GB build requires me to use a traditional ATX form factor motherboard with more DIMM slots. This will use more power and will cost about $900 more.

I realize cost is more of factor than size to most folks, but this website shows a comparison of ATX vs. Micro-ATX case sizes if you're not aware. The microATX case I usually go with is the same form factor as the "barebones" case shown on the website.

I created the poll below so I can determine which build you would like me to go with for my 5th generation server. I really appreciate your input.


Which new Hyper-V server build would you be more likely to buy?


I will be speaking at the IT/Dev Connections conference September 15-19 in Las Vegas. There, I will be hosting two sessions, "Build Your Own Super-Fast Exchange Lab for Under $2,000!" and an open mic forum entitled "Ask the Exchange Experts," a Q&A session about Exchange and Office 365 migration tips and tricks with fellow MVP Tony Redmond.

I will be bringing my latest Hyper-V lab server build to the lab session and will provide tips on how to build, manage, and use the server to advance your IT career. I hope to see you there!

Fix for MSExchange Mailbox Replication EventID 1121 Error Every Minute

$
0
0
I found that an error was being reported every 60 seconds from the MSExchange Mailbox Replication service with eventID 1121 on an Exchange 2013 CU5 server.
Log Name:      Application
Source:        MSExchange Mailbox Replication
Date:          8/15/2014 12:01:15 PM
Event ID:      1121
Task Category: Request
Level:         Error
Keywords:      Classic
User:          N/A
Computer:      SACEXCH01.Domain.local
Description:
The Microsoft Exchange Mailbox Replication service was unable to process a request due to an unexpected error.
Request GUID: 'b451acde-8d08-4a9a-a248-6bc4ca144aa2'
Database GUID: 'ed87ca06-6ce2-448a-9a3b-2c9984b067a5'
Error: Database 'aad284ae-7777-4896-93a5-cbc5e479841c' doesn't exist.
Stack trace:
   at Microsoft.Exchange.MailboxReplicationService.MapiUtils.FindServerForMdb(Guid mdbGuid, String dcName, NetworkCredential cred, FindServerFlags flags)
   at Microsoft.Exchange.MailboxReplicationService.MoveJob.ReserveLocalForestResources(ReservationContext reservation)
   at Microsoft.Exchange.MailboxReplicationService.MoveJob.AttemptToPick(MapiStore systemMailbox)
   at Microsoft.Exchange.MailboxReplicationService.SystemMailboxJobs.<>c__DisplayClassc.<ProcessJobsInBatches>b__6()
   at Microsoft.Exchange.MailboxReplicationService.CommonUtils.ProcessKnownExceptionsWithoutTracing(Action actionDelegate, FailureDelegate processFailure).
There are no open mailbox move requests, export requests, import requests, or migration batches.  I set diagnostic logging to expert, but nothing more than this single event every minute to nearly the second.

ed87ca06-6ce2-448a-9a3b-2c9984b067a5 resolves to an active database on this server.
aad284ae-7777-4896-93a5-cbc5e479841c does not resolve to any database in the org (obviously).

The fix is to remove the move request manually with the following cmdlet:
Remove-MoveRequest -MoveRequestQueue "ed87ca06-6ce2-448a-9a3b-2c9984b067a5" -MailboxGuid "b451acde-8d08-4a9a-a248-6bc4ca144aa2"
Immediately, the MSExchange Mailbox Replication event 1121 errors stopped.

Thycotic Secret Server Product Review

$
0
0
I don't normally do product reviews, but I like to share when I find something that works well.

I've been using Thycotic Secret Server for a while now to store my personal account information, passwords and account notes. It acts as a secure vault for for this important information. Prior to this, I'm ashamed to say, I was using the same username and password for most of my accounts. Obviously this is a terrible practice, especially in this day an age where banks, stores, and websites are frequently under attack for this information.

The Heartbleed Bug in OpenSSL brought this to the forefront for me. I knew I had to change all my passwords with new complex passwords, but the challenge of trying to remember all those passwords was an impossible task. I tested several different password management solutions, but none of them worked as well and as trouble free as Secret Server.

The following are the list of requirements I needed in a password management program:

  • Easy to use
  • Available remotely
  • Automatic complex password generation
  • Automatic login to password protected websites
  • Must work in the browsers I use (Internet Explorer and Chrome)
  • Must work with my iOS devices (iPhone and iPad)
Secret Server is just one of Thycotic's security products aimed at securing your personal and private data. Thycotic offers a free* Express Edition of Secret Server for private use, and this is what I'm running. OK, technically it's not "free" - it costs $10 per year, but Thycotic donates this to charity. Not only is this super cheap compared to other password management solutions, it also shows what a nice bunch these Thycotic folks are. Other editions have additional features and capabilities, such as the ability to change network passwords remotely, service account management, and provide high availability. I should also mention that all versions of Secret Server (including Express Edition) include full online support!

I installed Secret Server Express Edition on a dedicated Windows Server 2012 R2 web server, but you can also install it on an existing web server. You will need to install the IIS role and features, the .NET Framework 4.5.1, and Microsoft SQL Server 2012 Express. After that, the installation is a simple 5-step process and you can manage your passwords (secrets) right away. The comprehensive Secret Server Installation Guide walks you through the entire process, including prerequisites.

Once installed, you can access Secret Server through the IIS website you created. To add a new secret, select the Secret Template dropdown box in the upper right corner. The template you select contains all the relevant fields for the secret. I use the Web Password template for most of my secrets. This template allows me to use the Web Password Filler (described below).


Once a Web Password secret has been saved with the logon URL, username, and password, it's easy to have Secret Server log you in to the website with the unique complex password. Simply add the Web Password Filler applet to the Favorites on your web browsers:

Then click the Web Password Filler favorite when you want to logon to the website. You will need to login to the Secret Server if you aren't already, then Secret Server will automatically log you on to the website.  for example, here's the automatic logon for Amazon:

Thycotic also has a free Secret Server app on the Apple App Store so you can access your secrets and passwords from iOS devices. It doesn't offer the same auto sign-in feature, but it does provide easy access to launch logon URLs and copy complex passwords.


There are many other features that Secret Server provides, but I honestly haven't had a need to use them myself. Some of these advanced features include:

  • Roles-based access controls
  • Full auditing and reports
  • Email notifications
If you're looking for a full featured password management solution I encourage you give Secret Server a try. They offer a 30-day free trial.

Don't Deploy Exchange 2013 CU6 If You're a Hybrid Customer

$
0
0

I have confirmed With Microsoft that there are significant bugs in Exchange 2013 Cumulative Update 6 for hybrid customers.
Update: Microsoft just published a new article, Exchange Server 2013 databases unexpectedly fail over in a co-existence environment with Exchange Server 2007, which describes a different issue where Exchange 2013 databases unexpectedly fail over between the nodes of database availability groups. A hotfix is available for this issue, but you have to call Microsoft Support to get it.
Hybrid deployments are used to bridge the gap between Exchange on-premises and Office 365. An Exchange hybrid server is used as the on-prem MRS endpoint for mailbox moves to Office 365, provides rich coexistence (free/busy sharing), and provides encrypted TLS mail flow between on-prem and Office 365.

Both Exchange 2010 and Exchange 2013 support hybrid servers. If the on-prem environment is Exchange 2010, the existing Exchange 2010 Hub/CAS servers can be used as hybrid servers, or new Exchange 2013 servers can be deployed. Exchange 2007 customers must deploy at least one new hybrid server and they usually deploy Exchange 2013.

Microsoft has maintained that customers will always be able to manage their hybrid environments from on-prem. Hybrid servers are supposed to bridge the administrative gap, providing a single pane of glass through which customers can manage both on-prem and Exchange Online environments.

That was until Exchange 2013 CU6...

With CU6, admins can no longer use the Exchange Admin Center (EAC) to create new Office 365 mailboxes, move mailboxes to Exchange Online, or create In-Place Archive mailboxes. Admins either need to use the Exchange Management Shell (EMS) or logon to the Office 365 Portal to perform these actions. In addition, when you click the Office 365 tab it normally takes you to the Office 365 signon portal so you can manage your Office 365 tenant  Instead, it opens a new website for the Office 365 marketing page. These are huge problems for most hybrid customers and there's no mention of this anywhere in the CU6 release notes.

Here's the experience in Exchange 2013 CU5:

CU5 - Create New Office 365 Mailbox

CU5 - Move Mailbox to Exchange Online

CU5 - Create In-Place Archive Online

Exchange 2013 CU6 hybrid customers are greeted with an entirely different experience:
CU6 - Admins Can Only Create On-Prem Mailboxes

CU6 - Admins Can Only Move Mailboxes to Another On-Prem Mailbox

CU6 - Admins Can Only Create On-Prem Archive Mailboxes

And here's what Admins see when they click the Office 365 tab in the EAC:

CU6 - Office 365 Tab

I expect Microsoft to publish an article soon regarding these bugs, but with a long Labor Day weekend ahead of us I wouldn't expect anything sooner that Tuesday. I do expect that CU7 will correct these bugs. In the meantime, I recommend that hybrid customers do not deploy CU6 at this time.  If you've already deployed CU6 in your environment, there's no way to role back.

What do you think Microsoft should do? Pull CU6? Release an Interim Update, like they did for the CU5 hybrid bug? Leave your comment below.

Reporting Outlook Client Versions Using Log Parser Studio

$
0
0
Earlier, I wrote an article referencing Chris Lehr's Log Parser script to identify and report which Outlook client versions are being used to access Exchange. You can read that article here.

Today, I'm showing you how to do the same thing with Log Parser Studio using a configuration written by my friend Lars Eber, an Exchange Premier Field Engineer at Microsoft. Log Parser Studio 2.0 is a customizable GUI tool that greatly simplifies creating complex Log Parser 2.2 command-line queries and presents the output natively in an easy to read fashion.


If you don't have Log Parser 2.2 or Log Parser Studio 2.0 installed yet, you will need to do so. Just follow the links to download and install them (you'll need both). Then run LPS.EXE from the C:\LPSV2.D1 folder to run Log Parser Studio.

Download Lars'ExchangeClientVersion.zip configuration from my website and unzip it to a temporary location. In Log Parser Studio, click File > Import > .XML to Library, select the ExchangeClientVersion.XML file you just extracted, and click the Merge Now button.

To run the query, first configure Log Parser with the log folder location. Click the yellow folder icon and browse to the folder where the IIS logs exist. Normally, this is \\servername\c$\Program Files\Microsoft\Exchange Server\V15\Logging\RPC Client Access. Then select the Exchange Client Version Overview query in the library and click the red exclamation point icon to run it.

Log Parser Studio will run the query and provide easy to read results showing the user name, DN, client software, version, client mode (cached or online), client IP address, and the protocol used. Very useful!

Outlook Connection Status Shows "Clear [Anonymous]" and "SSL [No]"

$
0
0
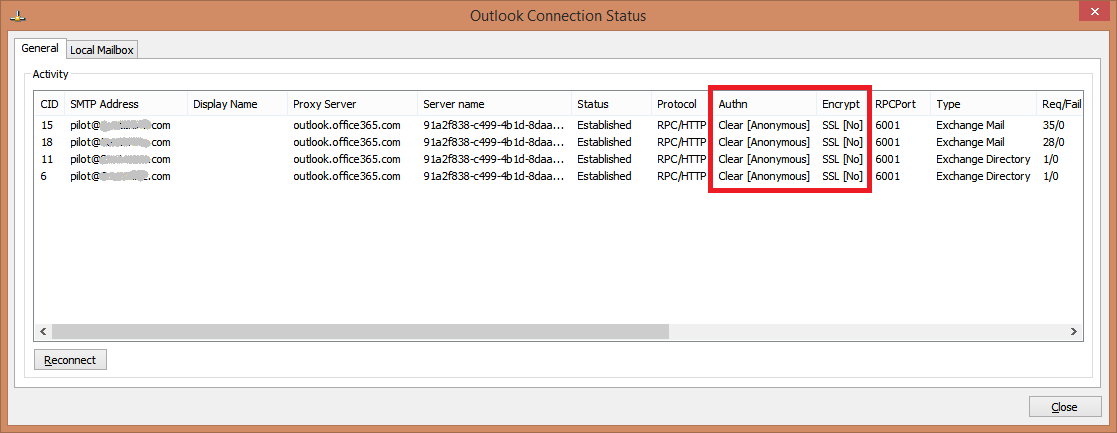
If your mailbox is hosted in Office 365 Exchange Online you may be surprised to see that the Outlook Connection Status shows Authn "Clear [Anonymous]" and Encrypt "SSL [No]", as shown below.

Outlook Connection Status
Note: You can view the Outlook Connection Status by ctrl+right-clicking the Outlook icon in the Windows Taskbar when Outlook is open or by running Outlook /rpcadmin from the Run menu.

Ctrl + Right-Click the Outlook Icon to view Connection Status

While "Clear [Anonymous]" authentication and "SSL [No]" encryption may look scary, understand that both authentication and encryption are enabled in the Service. 

The "Clear [Anonymous]" authentication method refers to the inner authentication channel that is no longer used in Office 365 since it only uses RPC over HTTPS. Technically, it should probably show either "n/a" or the external auth method (if Outlook can even see that). Just know that all authentication is performed at the HTTP layer now, which is encrypted via SSL.

The "SSL [No]" encryption method may well be a UI bug. I have a case open with Microsoft to look into it. In the meantime, I configured a Network Monitor trace to confirm that Outlook is using HTTPS to encrypt the authentication and connection with Office 365.

Here, we see a connection between Outlook 2013 and Exchange 2013.

Exchange 2013 NetMon Trace
The trace shows Outlook on the source computer (MAILGATE) starting up and connecting to the Exchange 2013 CAS (EX1).  In the first three frames we see Outlook negotiating with EX1 using HTTPS port 443. The next two frames show the SSL handshake and the certificate exchange with the target server, EX1. Note in the detail of frame 116 that the certificate being used to encrypt the conversation is a wildcard cert (*.theguillets.com) from DigiCert. From there on, we see that all communication is encrypted using TLS on port 443. All further authentication and application data transferred from EX1 is encrypted and cannot be read in the NetMon trace, proving that the entire conversation is encrypted.

Now let's take a look at the same process when Outlook 2013 connects to Exchange Online in Office 365:

Office 365 NetMon Trace
This trace shows the identical sequence of events. MAILGATE negotiates with the Office 365 CAS (OFFICE365) in the first three frames using HTTPS port 443. The next two frames show the SSL handshake and the certificate exchange with the target server, OFFICE365. Note in the detail of frame 576 that the certificate being used to encrypt the conversation is a SAN cert (outlook.office365.com) from Microsoft IT. Just like the connection with Exchange 2013, the entire conversation is encrypted and cannot be read by NetMon.


EXPTA Gen5 Windows 2012 R2 Hyper-V Server for Around $1,000 USD - Parts Lists and Videos!

$
0
0
I'm very pleased to announce the release of my 5th generation Windows Server 2012 R2 Hyper-V lab server, the Gen5!

You can use this home server to create your own private cloud, prototype design solutions, test new software, and run your own network like I do. Nothing provides a better learning tool than hands-on experience!

This is faster and more powerful than my 4th generation server and costs about $200 less!


My Design Requirements

This design is the best of all worlds - super-fast performance with higher SSD capacity at less cost. My core design criteria:
  • Windows Server 2012 R2 Hyper-V capable. Hyper-V for Windows Server 2012 R2 requires hypervisor-ready processors with Second Level Address Translation (SLAT).
  • Minimum of 4 cores
  • 32GB of fast DDR3 RAM
  • Must support fast SATA III 6Gb/s drives
  • Must have USB 3.0 ports for future portable devices
  • Low power requirements
  • Must be quiet
  • Small form factor
  • Budget: Around $1,000 USD
In the land of virtual machines, I/O is king. SSDs provide the biggest performance gains by far. You can invest in the fastest processor and RAM available, but if you're waiting on the disk subsystem you won't notice much in performance gains. That's why I focus on hyper-fast high-capacity SSDs in this build. Thankfully, SSDs have gotten bigger, faster, and cheaper over time. I'm going with brand new Crucial MX100 SATA3 SSDs in the Gen5 - one 256GB SSD for the OS and another 512GB SSD for active VMs. These drives provide up to 90,000 IOPS for random reads and up to 85,000 IOPS for random writes.

The second most important factor in Hyper-V server design is capacity. Memory, and to a smaller degree CPU, drives how many VMs you can run at once. Because I want a small form-factor, I need to go with a MicroATX motherboard and the maximum amount of memory that can be installed on these Intel-based motherboards is 32GB RAM. I chose 32GB Corsair XMS3 DDR3 RAM for this build. This is 1.5V PC-1333 RAM with a low Cas 9 latency and 9-9-9-24 timing. The single package includes four matched 8GB 240-pin dual-channel DIMMs.


The processor I chose is the new Intel I5-4590S Haswell-R Quad-Core CPU. Even though all four cores run at a quick 3.0 GHz, it still uses only 65W. It can be overclocked to 3.7 GHz, but it's already plenty fast enough. The beautiful Intel aluminum heatsink and fan included with the processor keeps the CPU running cool and quiet without the need for exotic liquid cooling or extra fans. This processor includes integrated Intel HD Graphics 4600, so there's no need for discrete video adapter.


I chose the ASRock B85M PRO4 Micro-ATX motherboard for the Gen5. I've used ASRock for previous builds and I think they produce some of the best motherboards available. This LGA 1150 mobo provides 4x SATA3 6Gbps ports (enough for all the drives in the Gen5) plus 2x SATA2 3Gbps ports. It also features the Intel B85 chipset, USB 3.0 and USB 2.0 headers, HDMI/DVI/VGA outputs, and an Intel I217V Gigabit NIC (which requires some tweaking - see my build notes below).


For mass storage I chose the tried-and-true Western Digital WD Blue 1TB SATA3 hard disk and a Samsung SH-224DB/RSBS 24X SATA DVD±RW drive. I use the WD Caviar Blue drive to store ISOs and VM base images. You can get a larger 2TB or 3TB version of the same drive for a few bucks more, but 1TB is plenty for most needs. Even so, I enable Windows Server 2012 R2 disk deduplication on all my drives to reduce the storage footprint. To save power, I configure Windows power settings to turn off the drive after 10 minutes of non-use.


All these components reside in a cool IN-WIN BL631.300TBL MicroATX Slim Desktop case. This is a new chassis to me and I'm quite impressed. It's smaller and lighter than the Rosewill Gen4 case and the build quality is great. Heavy gauge steel and no sharp edges. It includes a 300W power supply, which is more than enough. The total estimated power required for the Gen5 is normally 171W, and 191W with all drives running at the same time. The internal temperature stays at a cool 30C 24x7. The front panel has 4x USB 2.0 ports, audio outputs, and cool blue power light. I only wish the front USB ports were USB 3.0. I've actually found that it's a lot more convenient to use a 6.5' USB 3.0 A-Male to A-Female Extension Cable which I route up to my workspace, anyway.


Parts List

Here's the complete parts list for the Gen5 including the necessary drive bay converter, cables, and adapters. As usual, I link to Amazon because they nearly always have everything in stock, their prices are very competitive, and Amazon Prime gets you free two-day shipping! If you don't have Amazon Prime you can sign up here for a free 30-day trial and cancel after you've ordered the parts, if you want.

This time I'm including a handy "Buy from Amazon.combutton which allows you to put all the items into your cart with one click. That makes it easy to see the current price of all the items at once. Note that Amazon's prices do change depending on inventory, promotions, etc. At the time I purchased these parts, the total came out to $1045.89 USD with free two-day shipping.


ItemDescription
 
In-Win Case BL631.300TBL MicroATX Slim Desktop Black 300W 1x5.25 External Bays USB HD Audio
Sleek Micro ATX case with removable drive bay cage for easy access. 1x external 5.25" drive bay and 2x internal 3.5" drive bays. Includes quiet 300W PSU, 4x front USB 2.0 and audio ports. Great build quality and smooth folded edges. 3 year limited warranty.
 
Intel Core i5-4590S Processor (6M Cache, 3.70 GHz) BX80646I54590S
This is a 4th generation LGA 1150 Haswell-R Intel processor and includes Intel HD Graphics 4600. Runs at 3.0 GHz, but can be overclocked up to 3.70 GHz. Requires only 65W! Includes Intel aluminum heat sync and silent fan. 3 year limited warranty.
 
Corsair XMS3 32GB (4x8GB) DDR3 1333 MHz (PC3 10666) Desktop Memory (CMX32GX3M4A1333C9)
1.5V 240-pin dual channel 1333MHz DDR3 SDRAM with built-in heat spreaders. Low 9-9-9-24 Cas Latency. Great RAM at a great price. Package contains 4x 8GB DIMMs (32GB). Lifetime warranty.
 
ASRock LGA1150/Intel B85/DDR3/Quad CrossFireX/SATA3 and USB 3.0/A&GbE/MicroATX Motherboard B85M PRO4
I chose this LGA 1150 Micro ATX motherboard because it has 4x SATA 6Gb/s and 2x SATA 3Gb/s connectors. It uses the Intel B85 Express chipset, has 1x PCI-E 3.0 slot, 1x PCI-E 2.0 slot, 2x PCI slots, HDMI/DVI/VGA outputs, USB 3.0 and 2.0 ports, and an Intel I217V Gigabit NIC (see below). It also has a great UEFI BIOS (see video). 3 year limited warranty.
 
Crucial MX100 256GB SATA 2.5" 7mm (with 9.5mm adapter) Internal Solid State Drive CT256MX100SSD1
256GB SATA 6Gb/s (SATA III) SSD used for the Windows Server 2012 R2 operating system. New Marvell 88SS9189 controller with Micron Custom Firmware. MLC delivers up to 85,000 IOPS 4KB random read / 70,000 IOPS 4KB random write. 3 year warranty.
 
Crucial MX100 512GB SATA 2.5" 7mm (with 9.5mm adapter) Internal Solid State Drive CT512MX100SSD1
512GB SATA 6Gb/s (SATA III) SSD used for active VMs (the VMs I normally have running, like a Domain Controller, Exchange servers, Lync servers, etc.). MLC delivers up to 90K IOPS 4KB random read / 85K IOPS 4KB random write speed. Mwahaha! 3 year limited warranty.
 
WD Blue 1 TB Desktop Hard Drive: 3.5 Inch, 7200 RPM, SATA 6 Gb/s, 64 MB Cache - WD10EZEX
Best selling 1TB Western Digital Caviar Blue SATA 6Gb/s (SATA III) drive. Used for storing ISOs, seldom used VMs, base images, etc. I usually configure this drive to sleep after 10 minutes to save even more power. 2 year warranty.
 
Samsung SH-224DB/RSBS 24X SATA DVD±RW Internal Drive
Great quality 24x ±RW DVD burner. It's cheap, too. Even though it's SATA2, I connect this to one of the SATA3 ports on the motherboard for no particular reason. 1 year limited warranty.
 
SABRENT 3.5-Inch to SSD / 2.5-Inch HDD Bay Drives Converter (BK-HDDH)
Metal mounting kit for 2.5" SSD drives. One mounting kit holds up to two SSD drives, stacked on top of each other.
 
StarTech 6in 4 Pin Molex to SATA Power Cable Adapter (SATAPOWADAP)
The IN-WIN's 300W power supply has three SATA power connectors for drives, which is one short of what we need. Use this adapter to convert one of the two Molex connectors to SATA.
 
C&E CNE11445 SATA Data Cable (2pk.)
We need 4x SATA cables for this build. The ASRock motherboard comes with two black SATA cables and the Samsung DVD burner comes with another red SATA cable, so I need one more. This two-pack is cheaper than some single cables and who doesn't need an extra SATA cable anyway. Flat (not L shaped) connectors work best for this build. FYI there's no technical difference between SATA2 and SATA3 cables.

Click the video below for a description of my 5th Generation Hyper-V Lab server.


Here's a video demonstrating the blistering fast boot speed of this server:


Build Notes

Pictures speak louder than words. Here's a slideshow showing how I assembled the Gen5 server with detailed photos where needed. Sorry Apple device users, the slideshow below uses Flash so you'll need to see it from a real computer. :(


Once the components are put together you need to configure the UEFI BIOS before you can install Windows Server 2012 R2. Here's a helpful video showing how to update and configure the ASRock's UEFI BIOS:


Sweet! Now it's time to install Windows Server 2012 R2, which takes about 8 minutes from DVD. Amazing!


How to install the Intel I217V NIC Driver


After you install the OS we need to update the drivers, but there's a problem. Intel doesn't want you to use their desktop-class I217-V gigabit network adapter in Windows Server, so they cripple the drivers so they won't install on anything better than Windows 8.1. This is chicken poop, as far as I'm concerned, and shame on them! Lucky for you, I've done the hard work to remove this obstacle.
  • Run the following from an elevated CMD prompt:
bcdedit -set loadoptions DISABLE_INTEGRITY_CHECKS
bcdedit -set TESTSIGNING ON
  • Reboot the server.
  • Download the latest network driver from the Intel Download Center.You'll want the PROWinx64.exe file for Windows 8.1 x64.
  • Download the updated e1d64x64.inf driver file from my website.
  • Run the PROWinx64.exe file to extract the drivers and run the Intel(R) Network Connections Install Wizard. Do not click Next yet.
  • Right-click the Windows icon in the Taskbar and run %TEMP%. This will open File Explorer to the Temp folder used by Windows.
  • Open the RarSFX0 folder and drill down into the \PRO1000\Winx64\NDIS64 folder.
  • Copy the e1d64x64.inf file you downloaded from my website to this folder, overwriting the existing file.
  • Now continue the Intel Network Connections Install Wizard to complete the installation of the new driver.
  • You will see a security warning that the updated INF file is not digitally signed. Click Install this driver software anyway.
  • The driver will install and the Intel adapter will be enabled.
  • Run the following from an elevated CMD prompt:
bcdedit -set loadoptions ENABLE_INTEGRITY_CHECKS
bcdedit -set TESTSIGNING OFF
  • Reboot the server and you're done. Whew! Thanks a lot, Intel!!
Now you can install the other software and utilities from the ASRock motherboard DVD. The installer itself won't work because it's written for Windows 8, so just drill into the Drivers folder using File Explorer. I recommend installing the following software:
  • Intel Chipset Device Software (\Drivers\INF\Intel\(v9.4.0.1026)
  • Intel Management Engine Components (\Drivers\ME\Intel\v9.5.14.1724_5M)
  • Intel Graphics Driver (\Drivers\VGA\Intel\(v15.33.1.64.3277)
  • Intel Rapid Storage Technology (\Drivers\Rapid Storage Technology\Intel\(v12.8.0.1016))
  • RealTek Audio Drivers (\Drivers\Audio\REALTEK\(7004))
  • Marvell MSU V4 (\Drivers\SATA3\Marvell\(v4.1.0.2013))
  • ASRock Restart to UEFI (\Utilities\RestartToUEFI\ASRock)
  • ASRock A-Tuning Utility (\Utilities\A-Tuning\ASRock)
After you've installed the configuration utilities you should see that there are no unknown devices in Device Manager. It's time to install the Hyper-V role and start building out your home lab!


I'll be presenting a session on building and managing this Hyper-V server at IT/Dev Connections in Las Vegas on September 17, 2014. There will be lots of great content delivered by MCMs, MVPs, and other independent experts. I really hope you can make it! Please contact me for a special discount code.


As always, if you have any questions or comments please leave them below. I hope you enjoy reading about these server builds and take the opportunity to make this investment in your career.


How to Perform an Extended Message Trace in Office 365

$
0
0
You can use Message Trace from the Exchange Admin Center in the Office 365 Portal to trace emails through Exchange Online. You can trace messages based upon a number of criteria including email address, date range, delivery status, or message ID.

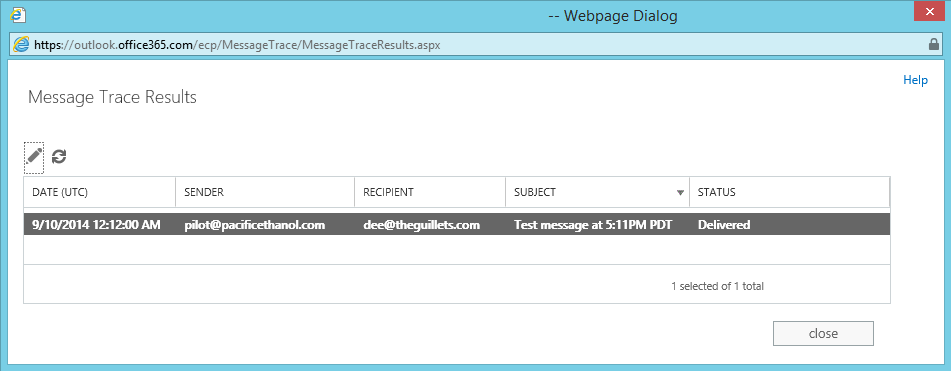
To perform a Message Trace, click Mail Flow in the EAC and select Message Trace, then enter the trace criteria. The high-level results will output to a new browser window.

High-Level Message Trace Output
Click the "pencil" icon to see more details on the selected item.

Detailed Message Trace Output
A standard message trace is useful for basic message tracing. It answers the question, "Did the message get delivered?", but that's about it. If you want to see all the real details of message transport you need to perform extended message tracing.

The trick to perform an extended message trace using the EAC is you have to choose a Custom date range of 8 days or more. You will then see additional options for the trace at the bottom of the form. Note that Exchange Online keeps logs for the last 90 days.

Extended Message Trace Options

Click the checkbox for Include message events and routing details with report, otherwise the report will only include a few more details than a regular trace: origin_timestamp, sender_address, recipient_status, message_subject, total_bytes, message_id, network_message_id, original_client_ip, directionality, connector_id, and delivery_priority. It also won't show each hop through Exchange online.

Note that including message events and routing details will result in a larger report that takes longer to process, so you will probably want to scope the message trace down to a particular sender or recipient. The following details will be included in the report: date_time, client_ip, client_hostname, server_ip, server_hostname, source_context, connector_id, source, event_id, internal_message_id, message_id, network_message_id, recipient_address, recipient_status, total_bytes, recipient_count, related_recipient_address, reference, message_subject, sender_address, return_path, message_info, directionality, tenant_id, original_client_ip, original_server_ip, and custom_data.

You have the option to choose the message direction (Inbound, Outbound, or All) and the original client IP address, if desired. You can also specify the report title and a notification email address. Note that the email address must be one for an accepted domain in your tenant. The mailbox does not have to be in the cloud.

The search will take some time, depending on the search criteria you entered and the volume of email. You can click View pending or completed traces at the top of the Message Trace form to view the status of the extended trace. When it completes you can click the link to Download this report or, if you configured the search to send a notification, click the report link in the notification email.


The extended message trace output is a CSV file that you can save and open in Excel. Here's the best way to view it in Excel:
  • Select cell A1 and press Shift-Ctrl-End to highlight all the cells.
  • Click Insert> Table and click OK.
  • Click View Freeze Panes > Freeze Top Row.
  • Select the entire worksheet and then double-click the line between columns A and B to autosize the all the columns in the table.
Auto size the columns in Excel
You will then have an extended trace report showing all the transport details of the messages that match your search criteria. This report can be filtered by clicking the drop down arrows on the title row.

If you plan to save the report, be sure to save it as an Excel Workbook (*.xlsx) or you will lose the formatting.

Scheduled Task to Update Your Federation Trust

$
0
0
Microsoft published an article this morning about keeping your federation trust up-to-date. This is really important if you are in a hybrid configuration or if you are sharing free/busy information between two different on-premises organizations using the Microsoft Federation Gateway as a trust broker. Microsoft periodically updates the certificates used by the Microsoft Federation Gateway and updating your federation trust keeps these certs up-to-date.

Exchange 2013 SP1 and later automatically updates the federation trust. If you're running at least this version of Exchange 2013 (and you should), you're good to go. If you're an Exchange 2013 RTM/CU1/CU2/CU3 customer who hasn't upgraded yet, read on...

In the article, Microsoft provides a command to run on one of your Exchange 2010 servers that creates a Scheduled Task to update the federation trust daily. This script only works on Exchange 2010. If you have a pure Exchange 2013 pre-SP1 environment, you can use this command to create a scheduled task:
Schtasks /create /sc Daily /tn FedRefresh /tr "%SYSTEMROOT%\System32\WindowsPowerShell\v1.0\powershell.exe -command ". $ENV:ExchangeInstallPath\bin\RemoteExchange.ps1; Connect-ExchangeServer -auto -ClientApplication:ManagementShell;$fedTrust = Get-FederationTrust;Set-FederationTrust -Identity $fedTrust.Name -RefreshMetadata" /ru System
Note that this version will also work on Exchange 2010 servers and also works in the rare occasion where PowerShell is not located on the C: volume.

Making the Case for Documentation

$
0
0
The Clouds are moving fast and it's sometimes difficult to catch up with changes in functionality and new features. Customers rely on accurate documentation about how things work to make important business decisions. This is made all the more difficult when documentation is confusing or, worse, flat out wrong.

Case in point is the documentation around Shared Mailboxes. The Exchange Online Limits service description around shared mailboxes is very precise:

Shared Mailboxes have a 10GB limit for all plans, except Office 365 Enterprise K1 and Office 365 Government K1, which do not support shared mailboxes. It also specifies the following caveats in regards to shared mailboxes:
A user must have an Exchange Online license in order to access a shared mailbox. Shared mailboxes don't require a separate license. However, if you want to enable In-Place Archive for a shared mailbox, you must assign an Exchange Online Plan 1 or Exchange Online Plan 2 license to the mailbox. If you want to enable In-Place Hold for a shared mailbox, you must assign an Exchange Online Plan 2 license to the mailbox. After a license is assigned to a shared mailbox, the mailbox size will increase to that of the licensed plan.

In-Place Archive can only be used to archive mail for a single user or entity for which a license has been applied. Using an In-Place Archive as a means to store mail from multiple users or entities is prohibited. For example, IT administrators can’t create shared mailboxes and have users copy (through the Cc or Bcc field, or through a transport rule) a shared mailbox for the explicit purpose of archiving.
The purpose of imposing these limits is to prevent a customer from abusing shared mailboxes, such as licensing one mailbox and then giving a "free" shared mailbox to everyone else in the company to save licensing costs. There are other limitations for shared mailboxes, such as the inability to access them using ActiveSync, that also makes them unsuitable as regular mailboxes.

As my ExtraTeam colleague, Chris Lehr, documents in his article, "Exchange Online Shared Mailboxes - Licensing, quota and compliance," the reality is quite different. Here's a summary of his findings:
  1. Shared mailboxes have a 50GB limit, not 10GB as per the documentation.
  2. You can put shared mailboxes on Litigation Hold or In-Place hold without licensing them, contrary to the documentation.
  3. If you put a shared mailbox on In-Place Hold, the Admin Console shows it's configured, but the Management Shell says it's not. In-Place hold does work, however.
With this in mind, why would you burn a license on a shared mailbox? Clearly the documentation is wrong or something is screwed up in the service.

All of this illustrates the need for clear, concise, and above all accurate documentation.

Unfortunately, Microsoft decided to lay off the Exchange technical writers in the latest round of cuts last month. Read Tony Redmond's article, "Microsoft layoffs impact Exchange technical writers - where now for documentation?" for his take on this. The presumption is that all Exchange documentation can be done cheaper in China, where most Office 365 development is done. While you're at it, check out "The best Exchange documentation update ever?"


This is another sad loss for the Exchange community but an even bigger loss for customers. How can they make good business decisions based on bad documentation?

My recommendation for shared mailboxes is to follow the official documentation for planning. You never know when Office 365 may actually enforce those limits or features.


Best Practices for Configuring Time in a Virtualized Environment

$
0
0
I frequently work with customers who are having trouble with time synchronization in their virtualized environment (whether they know it or not). Accurate time is immensely important in a Windows domain since the primary authentication protocol is Kerberos. Kerberos uses time-based ticketing and if the time is off 5 minutes or more between computers, random authentication errors and other problems occur.

Time synchronization normally occurs automatically in a Windows domain, but things can get pretty screwed up in a virtualized environment when the VMs are configured to sync from a host with inaccurate time.

The following are my best practices for configuring and managing time in a virtualized environment:
  • Configure the Domain Controller holding the PDC Emulator FSMO role to synchronize time from an accurate time source. Run the following two commands from an elevated CMD prompt:
w32tm /config /manualpeerlist:pool.ntp.org /syncfromflags:manual /reliable:yes /update

net stop w32time && net start w32time
  • Use pool.ntp.org as your external time source, as shown above. This is a load balanced set of time servers located around the world and will return the best server for your geographic location. You may instead want to get time from an internal source, In this case, change the w32tm command as required. You can specify multiple peers by enclosing them in quotes separated by commas (i.e., /manualpeerlist:"source1,10.0.0.1"). Your PDC Emulator needs User Datagram Protocol (UDP) port 123 access to get time from the target, so configure your firewall accordingly.
  • Disable time synchronization for all domain-joined VMs. How you do this depends on your virtualization platform. In VMware ESX it depends on the version you're running. In Hyper-V you do this by disabling Time Synchronization in Hyper-V Integration Services of the VM, as shown below.
    Note that while I have always advised doing this, Microsoft has recently updated their guidance to match (at least for domain controllers). See TechNet article, Running Domain Controllers in Hyper-V. I recommend doing this for all VMs.
  • Ensure your VM host is configured to get accurate time. If you run VMware vSphere or ESX you must configure the host to get time from an external time source. VMware has a nasty habit of syncing time to VMs even though you've told it not to. See my article, Fixing Time Errors on VMware vSphere and ESX Hosts. If you're running Hyper-V you should also configure the host to get accurate time. If the host is a member of the domain it should sync with the domain hierarchy, so you're set. If the host is in a workgroup, configure it to get Internet Time from pool.ntp.org, as shown below. Note that domain-joined computers do not have the Internet Time tab.
  • Restart the Windows Time service on all domain computers to synchronize time with the domain hierarchy. The Windows Time service is responsible for syncing time in the network. The computer's time should automatically update to match the Domain Controller time a few seconds after restarting the service. Use the following command to reset the service:
net stop w32time && net start w32time
    If the time difference is more than a 5 minutes, you may find that the computer will not update its time. You may need to reset the time manually, then restart the Windows Time service to get it into sync.
Please refer to the excellent TechNet article, How the Windows Time Service Works for more detailed about how time synchronization works in a computer network.

Microsoft Ignite - One Conference to Rule Them All!

$
0
0

Yesterday morning the on The Official Microsoft Blog announced the name for their new enterprise technology conference - Microsoft Ignite. This conference, called MUTEE (Microsoft Unified Technology Event for Enterprises by some folks, promises to be everything to everyone. It replaces TechEd North America, as well as all the specialty conferences held by those product teams over the year - MEC, the Lync Conference, the SharePoint Conference, MMS, etc.

Plus Office 365, of course.
It’s finally here — One enterprise conference with infinite possibilities.

For the first time ever, Microsoft Ignite brings together our best and brightest for a single, remarkable enterprise tech conference. Meet the minds that make it happen. For the first time under one roof, Microsoft Ignite gives you unprecedented access to hundreds of Microsoft technology and business leaders. Join us in Chicago.
In October I was invited to join the Microsoft Roundtable to provide feedback on this new conference. Microsoft was there to listen, not be heard. They were particularly interested in hearing our feedback on MEC (the Microsoft Exchange Conference), which is very highly regarded by both attendees and within Microsoft. MEC brought everything together in a perfect balance - mid-level and deep-dive sessions on Exchange (and Office 365), a tremendous sense of community, and attendees and product group members who are very passionate about this product.

My feedback was primarily about community, the depth of the sessions, and the level of participation that small sessions provide. I really think this is where MEC shines and I hope that Microsoft is able to pull off the same sort of vibe at Ignite.

By combining all these conferences into a single event, Microsoft expects 20,000(!) attendees at Ignite in Chicago. The expectation is to have 300-400 attendees per session, which is far too large to be "intimate". Microsoft is planning to have a lot of gathering areas for impromptu "chalk talks" and collaboration.

The conference center in Chicago is HUGE and should easily accommodate that many attendees. I hope that the sessions for each product are close to each other. It would be difficult to navigate long distances, both vertically and horizontally, if the sessions are spread out.

I have attended every TechEd since 2004 and I've always gotten great value out of these conferences. My take-aways and participation have changed over the years, but I still get a ton of information and collaboration from the community here. I look forward to the same thing going forward. I sit on The Krewe board of directors as Vice-President and know a lot about the value of community that conferences like this bring. The Krewe Facebook page continues to be a resource for TechEd and Krewe alumni, where members exchange questions, advice, and their views on our industry. I encourage you to check it out.

Overall, I'm hopeful that Microsoft Ignite will be able to pull off their ambitious goal of combining the dedicated technology conferences and TechEd into one mega conference, while maintaining the community and collaboration that smaller conferences like MEC and the SharePoint Conference were able to attain.

Microsoft Ignite - Come for the technology. Stay for the community.

#IWasMEC  --  #IamIgnite


Turning a Disaster Recovery Test into a Disaster

$
0
0

I recently assisted a customer with a disaster recovery test for Exchange 2013 that went very wrong. I'm sharing what happened here in case the same unfortunate series of events happen to you so you know how to recover from it, or better yet maybe prevent it in the first place.

The customer's Exchange 2013 environment consists of a three node DAG, two nodes in the primary datacenter and another in the DR datacenter. The DAG is configured for DAC mode. The customer wisely wanted to test the DR failover procedures so they know what to expect in case the primary datacenter goes offline.

The failover process went smoothly. The SMTP gateways and Exchange 2013 servers in the primary datacenter were turned off and the DAG was forced online in the DR datacenter. Internal and external DNS was then updated to point to the DR site. CAS connectivity and mail flow was tested successfully from all endpoints - life was good. The customer wanted to leave it failed over to the DR site for a few hours to confirm there were no issues. 

Now it was time to fail back. The documentation says to confirm that the primary datacenter is back online and there's full network connectivity between the Exchange servers in both sites. Then login to each DAG member in the primary site and run "cluster node /forcecleanup" to ensure the servers are ready to be rejoined to the DAG.

But the customer scrolled past the part about where to run the command and ran it on the only node in the DR site. This essentially wiped the cluster configuration from the only node that held it. Instantly, the cluster failed and all the databases went offline. Since no other cluster nodes were online there was nothing to fail back to.

We fixed it by turning on the two DAG members in the primary site and starting the DAG in that site. That brought the databases online, but they were not up to date. We used the Windows Failover Cluster Manager console to evict the DR node and then add it back in. After AD replicated we saw that replication between all three nodes was working and the databases came up to date from Safety Net. We didn't even need to reseed any of the database copies. Disaster averted.

So how did this happen and what can be done to prevent it?

Human nature is to skip large blocks of text and read for the steps that need to be done. This is especially true when you're fairly comfortable with the steps or you're under pressure. For this reason, I keep my procedures pretty concise with maybe a sentence or two explaining why this step or procedure is being done.

In this case, the customer scrolled past the text explaining where to run the command and just ran it from the wrong server.

Here are my suggestions for creating disaster recovery documentation.

  • Know your audience. You need to make an assumption about who will be reading the DR documentation. Will it be the same people who manage the infrastructure in the primary site? Maybe not, if this is a true disaster. Make sure you write the documentation for the right audience. Avoid acronyms that unfamiliar users may not know, or at least spell if out once and then add the acronym the first time you use it. For example, Client Access Server (CAS).
  • Keep your DR procedures concise. People skip walls of text. Murphy's Law says that DRs happen at the worst times and people don't want to read a bunch of background information that's not pertinent to the task at hand. In a real disaster there will probably be a lot of other things going on and management asking for status. You might want to write your procedures like a cookie recipe. You don't need to be a chef to follow a recipe, but you do need to know how to fix it if something in the recipe goes wrong. Provide links in the documentation that reference TechNet concepts, as needed.
  • Highlight important steps. Use highlighting to call out important steps in the procedures, but don't overdo it. Too much highlighting will make it difficult to read. You can highlight using color or simple blocks of text, such as:
Important: The following procedures should be run from SERVER1.
  • Make sure the steps read top to bottom. Don't bounce around in the document or refer to previous steps unless it's something like, "Repeat for all other client access servers." Avoid procedures like, "Cut the blue wire after cutting the red wire." Try not to allow page breaks between important steps, if possible.
  • Use targeted commands, when possible. If a command can be targeted to a specific object it won't run if the object is unavailable. For example, the command "cluster node SERVER1 /forcecleanup" will run only if SERVER1 is up, rather than assuming the user is running it from the correct server. This particular suggestion would have prevented the unexpected outage in my example.

How to Enable RelayState in ADFS 2.0 and ADFS 3.0

$
0
0
RelayState is a parameter of the SAML protocol that is used to identify the specific resource the user will access after they are signed in and directed to the relying party’s federation server. It is used by Google Apps and other SAML 2.0 resource providers.

If RelayState is not enabled in AD FS, users will see something similar to this error after they authenticate to resource providers that require it:

The Required Response Parameter RelayState Was Missing

For ADFS 2.0, you must install update KB2681584 (Update Rollup 2) or KB2790338 (Update Rollup 3) to provide RelayState support. ADFS 3.0 has RelayState support built in. In both cases RelayState still needs to be enabled.

Use the following steps to enable the RelayState parameter on your AD FS servers:

  • For ADFS 2.0, open the following file in Notepad: 
%systemroot%\inetpub\adfs\ls\web.config
  • For ADFS 3.0, open the following file in Notepad:
%systemroot%\ADFS\Microsoft.IdentityServer.Servicehost.exe.config

  • In the microsoft.identityServer.web section, add a line for useRelyStateForIdpInitiatedSignOn as follows, and save the change:
<microsoft.identityServer.web>    ...    <useRelayStateForIdpInitiatedSignOn enabled="true" />    ...</microsoft.identityServer.web>
  • For ADFS 2.0, run IISReset to restart IIS.
  • For both platforms, restart the Active Directory Federation Services (adfssrv) service.
If you're using ADFS 3.0 you only need to do the above on your ADFS 3.0 servers, not the WAP servers.


Is Your Organization Using SHA-1 SSL Certificates?

$
0
0

I just published an article on Windows IT Pro about Microsoft's decision to block Windows from accepting SHA-1 SSL certificates. This has important ramifications for your users and your IT environment. Don't be caught unaware.

Read "Is Your Organization Using SHA-1 SSL Certificates?" on Windows IT Pro here.

New Remote Desktop Connection Manager 2.7 Released

$
0
0


Microsoft released a new version of Remote Desktop Connection Manager (RDCMan) 2.7 to the public today.

RDCMan is a central place where you can organize, group, and manage your various Remote Desktop connections. This is particularly useful for system administrators, developers, testers, and lab managers who maintain groups of computers and connect to them frequently. I probably spend more time in RDC Manager than any other application during the day.

The previous version 2.2 was last released in May 2010, so this is a very welcome update. Previous versions lacked some functions and caused excessive CPU utilization on some computers, especially those with Nvidia GPUs. RDCMan was written by Julian Burger, one of the principal developers on the Windows Live Experiences team.

RDCMan 2.7 version is a major feature release. New features include:

  • Virtual machine connect-to-console support.
  • Smart groups.
  • Support for credential encryption with certificates.
  • Windows 8 remote action support (charms, app commands, switch tasks, etc).
  • Support for Windows 8, Windows 8.1 / Windows Server 2012, Windows Server 2012 R2.
  • Log Off Server now works properly on all versions.
Important Upgrade Notes: You should know that when you upgrade, RDCMan will be unable to read any saved encrypted passwords. You will need to re-enter your saved encrypted passwords after installation.
The workaround is to set the "Store password as clear text" checkbox in RDCMan 2.2 for preexisting groups and/or servers. When you upgrade to version 2.7, RDCMan will read the existing passwords and will encrypt them. "Store passwords as plain text" is no longer an option in version 2.7.


Beware Installing .NET 4.5.2 Update on Exchange Servers

$
0
0
Windows Update is now offering the the .NET Framework 4.5.2 update as an "Important" update to Windows computers.
  • Microsoft .NET Framework 4.5.2 for Windows 8.1 and Windows Server 2012 R2 for x64-based Systems (KB2934520)
  • Microsoft .NET Framework 4.5.2 for Windows Server 2008 R2 for x64-based Systems (KB2901983)
Both of these updates require a restart. Note that .NET Framework 4.5.2 is only supported and recommended for Exchange 2013 CU7, but it is being offered as an Important update to all Windows servers. If your servers or patching processes use Windows Update you will still see these updates are being pushed to them. Personally, I have not experienced any issues with .NET Framework 4.5.2 installed on pre-CU7 Exchange servers.

Windows Update on Windows Server 2012 R2
Windows Update on Windows Server 2008 R2

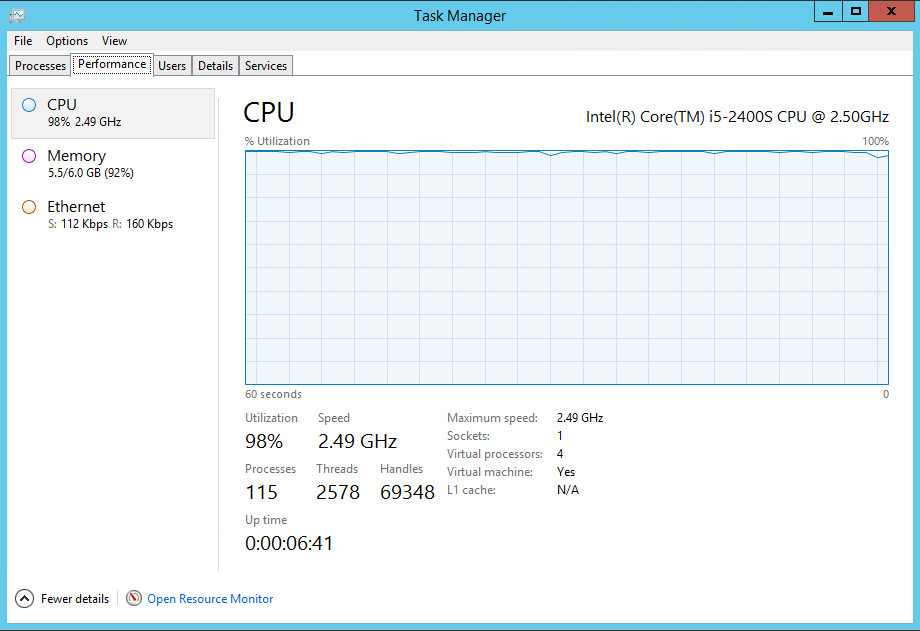
When the .NET Framework update is installed on your Windows servers it will re-optimize all .NET assemblies on the server when it restarts. Perfmon shows ~99% of CPU resources are in use for about 15-20 minutes while this occurs.

98% CPU Utilization After Restart

.NET Runtime Optimization Service Racing
To be fair, this behavior happens with any .NET Framework update, not just this version.

The main culprits are the mscorsvw.exe process (The .NET Runtime Optimization Service), TiWorker.exe process (Windows Modules Installer Worker), and Ngen.exe (Microsoft Common Language Runtime native compiler), as shown above. Exchange uses .NET assemblies extensively in its own code, so this optimization will affect the server's ability to function properly until this process completes. It will take significantly longer for the server to restart and system performance will be very very poor.

Once the the re-optimization process completes the Exchange server performance will eventually return to normal. This may take some time because other processes such as the IIS Worker processes and Exchange services were starved for resources and need to "warm up". In some cases I have seen Exchange services, such as the Microsoft Exchange Transport service, fail to start. Make sure all your services are running and performance returns to normal before moving on to patch the next server. I even suggest restarting the patched server one more time just to make sure it restarts normally and all services start properly first.

You should also be aware that if the Exchange server is load balanced using "least connections" the load balancer will probably drive all future connections to the server that is recompiling and those users will have a less than stellar experience. I recommend putting servers into maintenance mode on the load balancer prior to updating them and re-enabling them once optimization completes.

Tip: If you need to update .NET Framework on several servers it can take quite a bit of time for all this optimization. The mscorswv.exe process only uses one core by default. You can use the script from the .NET Framework Blog to improve the performance of this process by allowing it to use multiple threads and up to 6 cores.


KEMP Series: Introduction to Load Balancing for Exchange and Other Workloads

$
0
0
Today I'm beginning a series of articles detailing load balancing for Exchange using the Kemp virtual load balancer (VLB). In this series I will cover the following:
  • Introduction to Load Balancing for Exchange and Other Workloads (this article)
  • How to Configure General Settings on the KEMP Virtual LoadMaster
  • How to Configure an L7 KEMP Virtual Load Balancer (VLB) for Exchange 2013
  • How to Configure an L4 KEMP Virtual Load Balancer (VLB) for Exchange 2013
  • How to Restrict Exchange Admin Console Access From the Internet Using KEMP VLB
I'm using a KEMP virtual load balancer in this series for a number of reasons. First, they offer a free trial version downloadable from their website. Second, it's very easy to configure. And third, a virtual load balancer works great with a home lab setup like my 5th Gen Hyper-V Lab Server.

Why Use a Load Balancer?

A load balancer is required when you have two or more Exchange servers with the Client Access Server (CAS) role installed in the same site for high availability. Load balancers have the intelligence to distribute client traffic amongst the CAS roles in either a round-robin or least connections method. Layer 7 (L7) load balancers also have the intelligence to perform multiple health checks on each node to determine if it's healthy to accept new connections. If the service on one node becomes unavailable, the load balancer will automatically redirect all traffic for that service to a healthy node, if one is available.

Load balancers are also able to load balance many other workloads such as web servers, SharePoint Servers, Lync servers, etc. Typically each service or workload has its own virtual IP (VIP). When clients connect to a service, say OWA, DNS points the namespace to that VIP on the load balancer. The load balancer then directs the traffic to a healthy node offering that service.

Load Balancer Configurations

Load Balancers are often either configured as one-arm (single NIC) or two-arm (two NICs, one for inbound traffic and another for outbound traffic). See Basic Load-Balancer Scenarios Explained for details on the two. For simplicity we will be configuring our load balancer as one-arm.

Oftentimes load balancers are used to load balance HTTPS traffic. For example, mail.contoso.com for OWA. Here, you have three choices:

1.     Terminate the SSL connection at the load balancer and pass the connection through to the target node unencrypted. This is known as SSL offloading. The SSL certificate is installed only on the load balancer. Exchange virtual directories are configured to use HTTP and SSL Offloading is enabled.
2.     Terminate the SSL connection at the load balancer and then re-encrypt the connection to the target node. This is called SSL bridging. The SSL certificate is installed on the load balancer and another SSL certificate is installed on the target nodes. The load balancer must trust the certificate on the target nodes.
3.     Pass the SSL connection through the load balancer and terminate the SSL connection on the target node. This is called SSL passthrough. The SSL cert is installed only on the target nodes.

Of these options, SSL bridging and SSL passthrough are most common. SSL bridging has the advantage of protocol inspection by the load balancer. Since the session terminates on the load balancer it is able to read or inspect the traffic that going through it. This can be useful for advanced load balancing features or logic, but it adds complexity to the load balancing solution. You'll need to manage separate SSL certificates for the load balancer and target nodes, and it adds CPU overhead because all traffic must be unencrypted, inspected, and re-encrypted. On the flip side, the obvious benefit is the ability to maximize server resource usage by being able to load balance individual services such as OWA, ActiveSync, etc., instead of failing over the entire server when one of the services is affected.

SSL passthrough simply passes all SSL traffic through the load balancer to the target node where it is unencrypted. The load balancer is unable to read or inspect the traffic going through it because it is encrypted, so you won't be able to do anything fancy on the load balancer. As an administrator, you'll only need to manage the SSL certs on the target nodes. On the flip side, if any service used for health check fails, the entire server is taken out of load balancing pool.

In all these three options you should configure the load balancer to NAT the traffic to the real servers. Because of this, the target nodes always see the load balancer as the source IP for load balanced connections. This is also important to know when you are reviewing IIS logs on the target server. For this reason, I usually configure an X-Forward-For header that includes the original source IP. More on that later in the series.

Note: If you prefer to not use NAT on the load balancer, Direct Server Return may be an option to consider. DSR requires additional configuration on load balanced servers and may not be desired due to supportability and additional overhead concerns. Another option when not using NAT is to configure the load balanced servers to use the load balancer as their default gateway. I do not recommend DSR for Exchange and will not be covering it in this series.

Now that we have some of the basics out of the way, let's get started.

Getting Your Free KEMP Virtual Load Balancer Trial

KEMP Technologies offers a fully functional 30-day free trial for their entire LoadMaster family of virtual load balancers. Better yet, if you are a Microsoft Certified Professional (MCP), MVP, or MCM you can register for a free NFR license! This license is good for one year with free renewals as long as the offer is valid. You also get free web support!


For this series I'll be working with the VLM-200. To download the virtual LoadMaster simply click the free trial link, select your hypervisor, country and click download. VLM supports 14 different hypervisors including various versions of Hyper-V, VMware, and Xen.


After you click download you will be redirected to the Free Trial Activation page and your download will begin. To activate your free trial you need to create a KEMP ID from this page. Do that while you're downloading. If you're requesting a LoadMaster NFR license you'll need a KEMP ID, the VLM serial number (get that from the VLM after it's running), and your MCP transcript ID and access code.

The download will consist of a ZIP file that contains the correct files for your hypervisor along with an installation guide. All you need to do is extract the contents and import them into your virtual server management console. For Hyper-V R2 select Import Virtual Machine, browse to the Loadmaster VLM folder, and click Next three times. On the Connect to Network page select your virtual switch, click Next and Finish. The new VLM virtual machine is preconfigured to use 2 virtual CPUs and 1GB of RAM.

Once imported start it up so you can get your trial license. Connect to the VM console to watch it boot up. The VLM is configured for DHCP and should show its management URL and login credentials. The default username is bal and the password is 1fourall. You'll change this later.

KEMP VLM Boot Screen

Licensing the KEMP Virtual LoadMaster
Open your web browser to the URL shown in the console. It's normal to receive a certificate warning, just click through it. Accept the license terms and allow automatic updates. Now you will license your KEMP LoadMaster. Enter your KEMP ID and password and the LoadMaster will license itself as long as it has Internet access.

If it does not have Internet access you will need to select Offline Licensing and complete the form to obtain your license information to paste into the VLM licensing form. When licensing is successful, the VLM will indicate that the license has been installed and when it expires.

Next, the VLM will have you change the default password and log back in to begin configuration.

In the next part of the series, I will show you how to configure general settings on the virtual LoadMaster to load balance Exchange 2013.

KEMP Series: How to Configure General Settings on the KEMP Virtual LoadMaster

$
0
0
This is part two in a series of articles detailing load balancing for Exchange using the KEMP virtual load balancer (VLB). In this article we will be configuring the general settings for the VLB before we configure specific settings for L4 or L7 load balancing.

The other articles in this series are:
  • Introduction to Load Balancing for Exchange and Other Workloads
  • How to Configure General Settings on the KEMP Virtual LoadMaster (this article)
  • How to Configure an L7 KEMP Virtual Load Balancer (VLB) for Exchange 2013
  • How to Configure an L4 KEMP Virtual Load Balancer (VLB) for Exchange 2013
  • How to Restrict Exchange Admin Console Access From the Internet Using KEMP VLB
In the previous article I gave a brief overview of some of the fundamentals of load balancing and described how to download and install a free trial of the KEMP Virtual LoadMaster. Now we will configure the general settings using the web interface.

Begin by logging into the VLB management interface from a web browser with the password you configured earlier. Remember the admin username is bal.

System Configuration

Click System Configuration on the left to expand these options. Under Interfaces you will see that the VLB has two NICs, eth0 and eth1. Since we are configuring a one-armed load balancer only eth0 has an IP address, which it got from DHCP. This is the IP address used for incoming traffic that will be load balanced. It is also currently used as the management IP. We will not be using eth1, so that IP is blank.

You will want to change the IP address for eth0 to a static IP. Enter the static IP address in CIDR format (i.e, 192.168.1.60/24) and click the Set Address button. After confirming the change, your browser will be redirected to the new IP address.


You'll notice that the link speed is set to automatic and it shows the current speed and duplex. You have the option to adjust the MTU (1500 is correct for most networks) and you can configure a VLAN if required.

Expand Local DNS Configuration. Here you can set a new hostname for the VLB if you wish (the default name is lb100). Click DNS Configuration to set your DNS server IP(s) and your DNS search domains.


Under Route Management. confirm that the default gateway IP address is correct. If you need to change it remember to click the Set IPv4 Default Gateway button.

Expand System Administration. Here is where you can change your password, update the KEMP LoadMaster license, shutdown or restart the VLB, update the LoadMaster software, and backup or restore the configuration.

Click Date/Time to enter the NTP host(s) to use for accurate time. I recommend using a local Domain Controller and/or pool.ntp.org. You can enter multiple NTP server names or IPs separated by spaces. Click the Set NTP Host button to save the configuration. Then set your local timezone and click the Set TimeZone button to save it.

Expand Miscellaneous Options and click Remote Access. Change the port used for Allow Web Administrative Access from port 443 to a custom port, such as 8443. This will allow you to access the LoadMaster web UI using a URL such as https://192.168.1.60:8443. If you change the UI port, you will be able to load balance SSL port 443 traffic using the same IP, otherwise you will need to configure additional IP address to load balance the same port. Remember to click the Set Port button to save the change. You will need to restart the LoadMaster to affect the port change. Do so under System Administration > System Reboot > Reboot. Once it restarts access the web UI using the new URL:port and login.

Expand System Configuration > Miscellaneous Options > L7 Configuration. Select X-Forward-For for the Additional L7 Header field. This will configure the VLB to forward the client's original IP address to the real server so it can be logged.


Also configure a value for Least Connections Slow Start and click the Set Slow Start button. This is the number of seconds that the LoadMaster will throttle connections after a node comes online. The default value is 0, which means no throttling. Slow Start prevents the load balancer from overloading a node that comes back online because it has no current connections.

Certificates

If you plan to do SSL offloading or SSL bridging you will need to install the endpoint's SSL certificate on the load balancer. As described in the first part of this series, with this configuration client connections terminate at the load balancer. The load balancer then sends traffic to the real servers as HTTP (offloading) or re-encrypts the traffic to the real servers (bridging).

To install an SSL certificate on the VLB click Certificates > SSL Certificates. Under Manage Certificates click the Import Certificate button. Click the Choose File button to browse for the certificate file. Most times this is a PFX file which includes the certificate and private key. Enter the password for the PFX file in the Pass Phrase field and enter a useful Certificate Identifier.


Click Save to import the SSL certificate. You will now see that the SSL certificate is installed.


Almost all third-party trusted CAs use intermediate CAs to issue their certificates. You should install these intermediate certs on the load balancer, too. Click the Add Intermediate button on SSL Certificates.Click the Choose File button and browse for the intermediate CA cert file(s) to install. These certs need to be .cer or .pem files. Once they are installed you will see see them under Certificates > Intermediate Certs.


That does it for configuring general settings. In the next article I'll cover how to configure layer 7 load balancing for Exchange 2013.

Viewing all 301 articles
Browse latest View live